
前言
本文旨在记录将waline评论系统部署至个人博客的过程中踩过的那些坑。另外,在文章开始之前先简单介绍一下此博客的本地环境,以及waline相关的基础信息:
- 博客环境:基于 Github Pages 和 Jekyll 搭建, 使用 Chirpy 主题。文中后续提到的操作都是在此主题模板的基础上进行的魔改。
- waline相关:后台使用 LeanCloud 国际版。
1. 添加评论区
部署过程
详细内容可以参照waline的 官方教程 。简单概括如下:
- LeanCloud 账号注册及设置。此为管理waline评论系统所用的数据库,也即后台。
- 在 Vercel 上进行服务器端部署。
- HTML引入。需要在自己的网站(在这里即为此博客)上导入waline。具体如下:
导入waline样式。 在 _includes/head.html 中添加如下语句:
1
2
3
4
5
 <!-- Waline -->
 <link
     rel="stylesheet"
     href="https://unpkg.com/@waline/client@v2/dist/waline.css"
 />
初始化waline。 此博客采用Jekyll进行静态网页的渲染,其支持在语句中添加对于指定html文件的引用,只需要该html文件位于
_includes目录下。所以这里选择将waline初始化语句独立出来,放置在 _includes/comment/waline.html 中,这样也便于后续的管理以及拓展。其内容如下:1 2 3 4 5 6 7 8 9 10 11 12 13 14 15 16 17
<div id="waline"> <script type="module"> import { init } from 'https://unpkg.com/@waline/client@v2/dist/waline.mjs'; init({ el: '#waline', serverURL: '<YOUR_SERVER_URL>', /* enter your server url */ comment: true, texRenderer: (blockMode, tex) => window.MathJax.startup.adaptor.outerHTML( window.MathJax.tex2svg(tex, { display: blockMode, }), ), }); </script> </div>
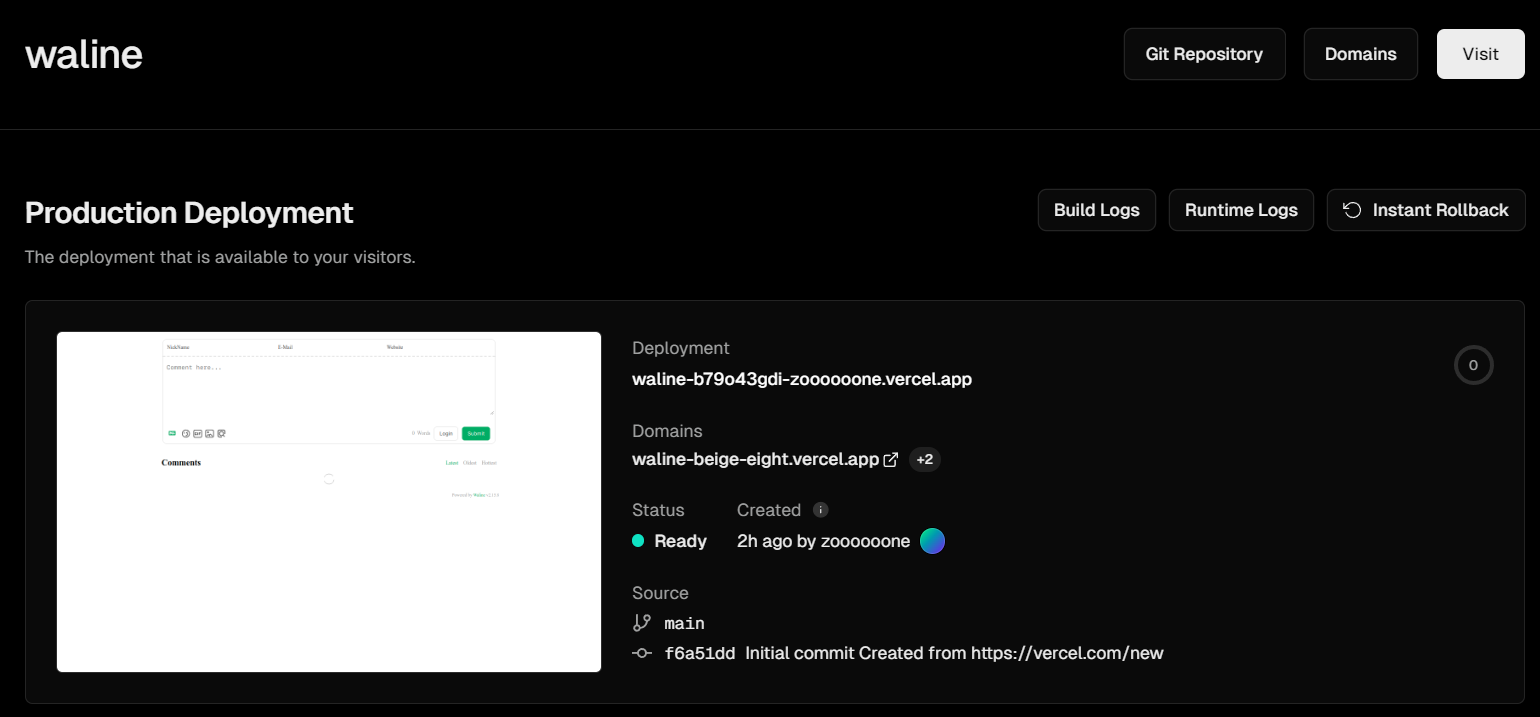
注:在初始化waline的时候,需要传入
serverURL这个参数,这个链接便是上一步于Vercel上进行服务端部署后得到的地址。示意如下:![]()
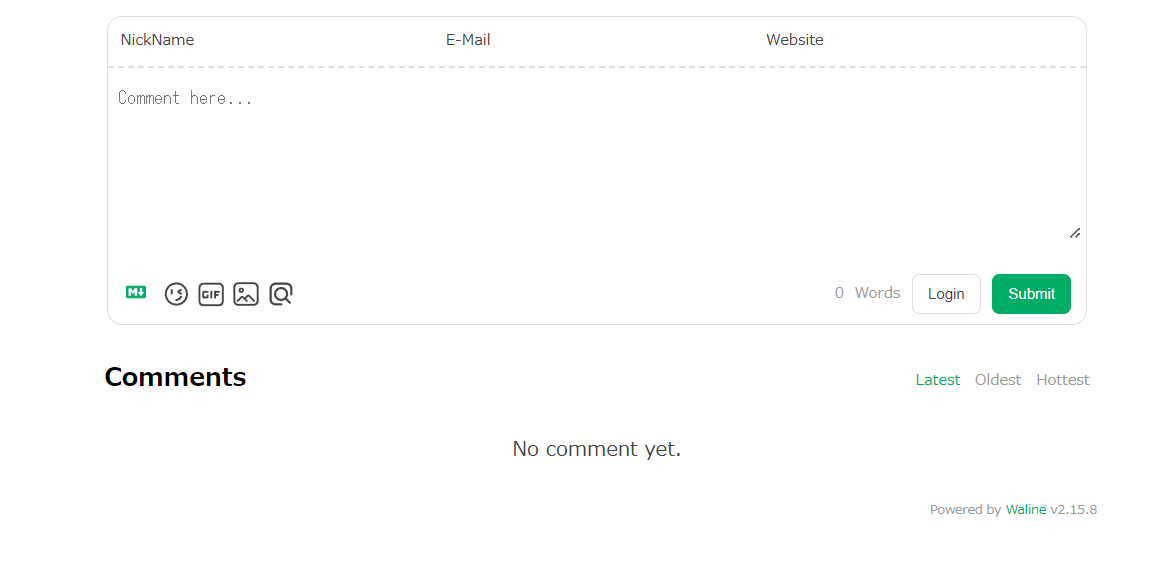
此时点击右上角的 Visit 后进入评论测试页面:
![]()
该页面对应的地址便是
serverURL所需的值。将评论区模块导入到博客的对应页面。 在 _layouts/page.html 中定位到
tail的部分:1 2 3 4 5 6 7 8 9 10 11
<!-- tail --> {% if has_tail %} <div class="row"> <div id="tail-wrapper" class="col-12 col-lg-11 col-xl-9 px-3 pe-xl-4 mt-5"> {% for _include in layout.tail_includes %} {% assign _include_path = _include | append: '.html' %} {% include {{ _include_path }} lang=lang %} {% endfor %} </div> </div> {% endif %}
在其中的
for语句之后添加对初始化waline的html文件的引用:1 2 3 4 5 6 7 8 9 10 11 12 13 14
{% if has_tail %} <div class="row"> <div id="tail-wrapper" class="col-12 col-lg-11 col-xl-9 px-3 pe-xl-4 mt-5"> {% for _include in layout.tail_includes %} {% assign _include_path = _include | append: '.html' %} {% include {{ _include_path }} lang=lang %} {% endfor %} <!-- waline --> {% if page.comments %} {% include comments/waline.html %} {% endif %} </div> </div> {% endif %}注:这里给引用添加了一个条件判断:
1
 {% if page.comments %}
其目的是 控制评论区的显示。在这个判断条件的限制下,只有当页面的YAML头信息里指明了
comment属性为true时评论区才会显示。例如此博客只在 _layouts/post.html 的头信息中进行指定:1 2 3 4 5 6
layout: page comments: true tail_includes: - related-posts - post-nav - comments
这样便只有在博客文章的页面下才会看到评论区了。
2. 评论通知开启
官方文档
waline评论系统是支持通知功能的,也就是说当有人评论了博客文章后,博主便可以通过先前设置好的渠道接收到相关的通知。waline本身支持许多渠道的通知方式,包括但不限于QQ,微信,邮箱等。本人最初尝试了微信通知,但奈何技术水平或者理解能力有限,迟迟未能配置成功,也没太弄明白其中原理。在拖延了好一阵子后,想了想还是试试看邮箱通知能不能行得通吧,遂又参考官网给出的 教程 。
这里还是简单概括一下,想要设置邮箱通知的话只需要在先前于Vercel上的服务端部署中设置如下几种必需的环境变量即可:
SMTP_SERVICE: SMTP 邮件发送服务提供商,具体参考 这里 。如果运营商不支持,则必须填写SMTP_HOST和SMTP_PORT。本人选择的是利用Gmail邮箱接受通知,关于Gmail的服务提供商信息如下:1 2 3 4 5 6 7
"Gmail": { "aliases": ["Google Mail"], "domains": ["gmail.com", "googlemail.com"], "host": "smtp.gmail.com", "port": 465, "secure": true }因此,
SMTP_SERVICE处只需填写 Gmail 即可。SMTP_USER: SMTP 邮件发送服务的用户名,一般为登录邮箱。SMTP_PASS: SMTP 邮件发送服务的密码,一般为邮箱登录密码,部分邮箱(例如 163)是单独的 SMTP 密码。SMTP_SECURE: 是否使用 SSL 连接 SMTP。SITE_NAME: 网站名称,用于在消息中显示。SITE_URL: 网站地址,用于在消息中显示。AUTHOR_EMAIL: 博主邮箱,用来接收新评论通知。如果是博主发布的评论则不进行提醒通知。
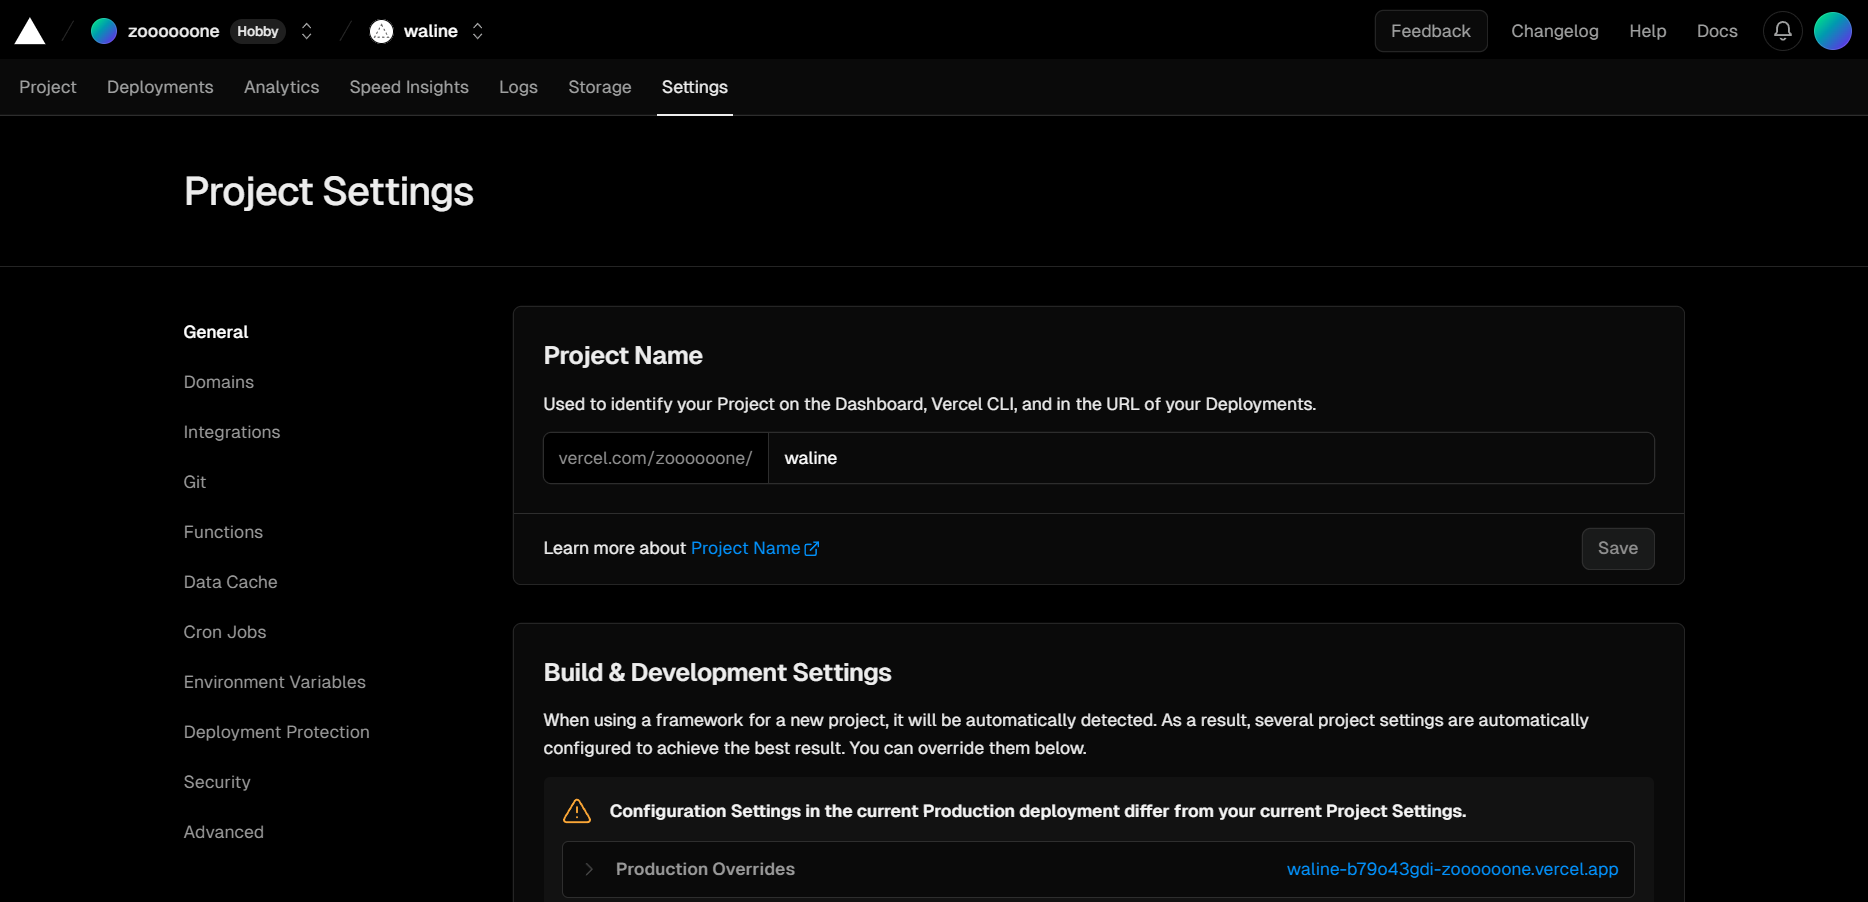
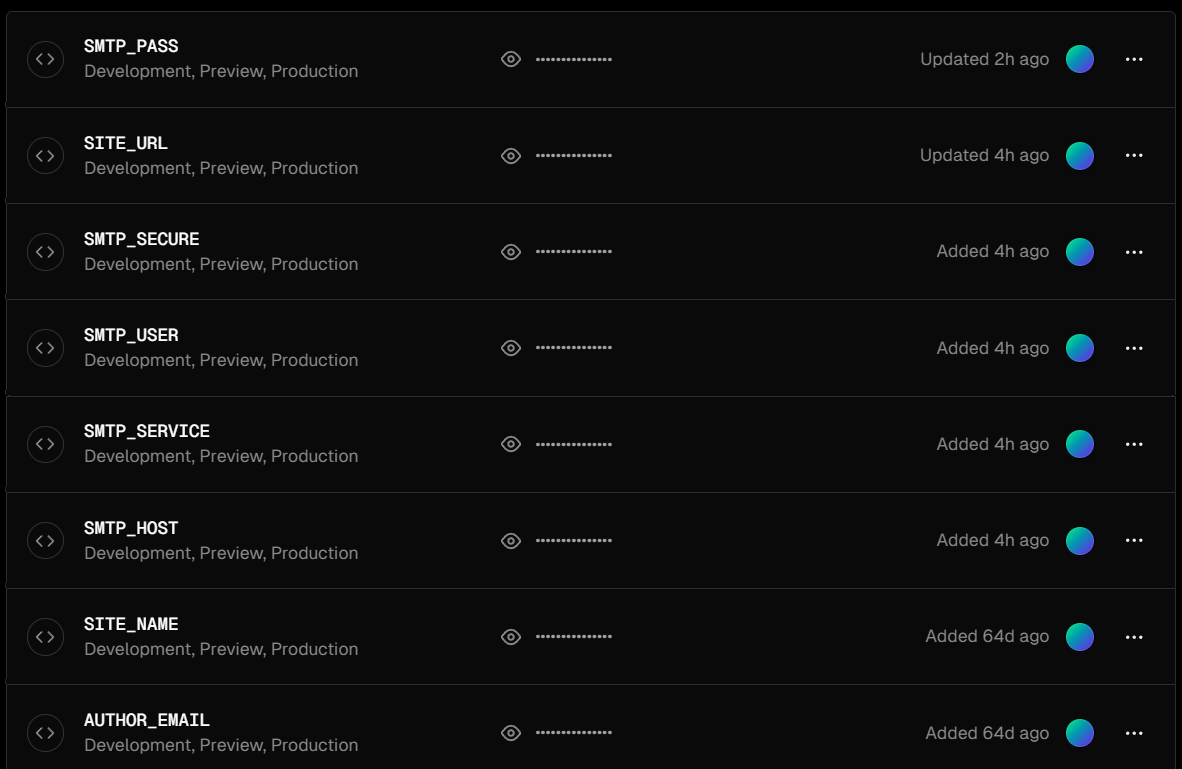
环境变量的设置方式如下:
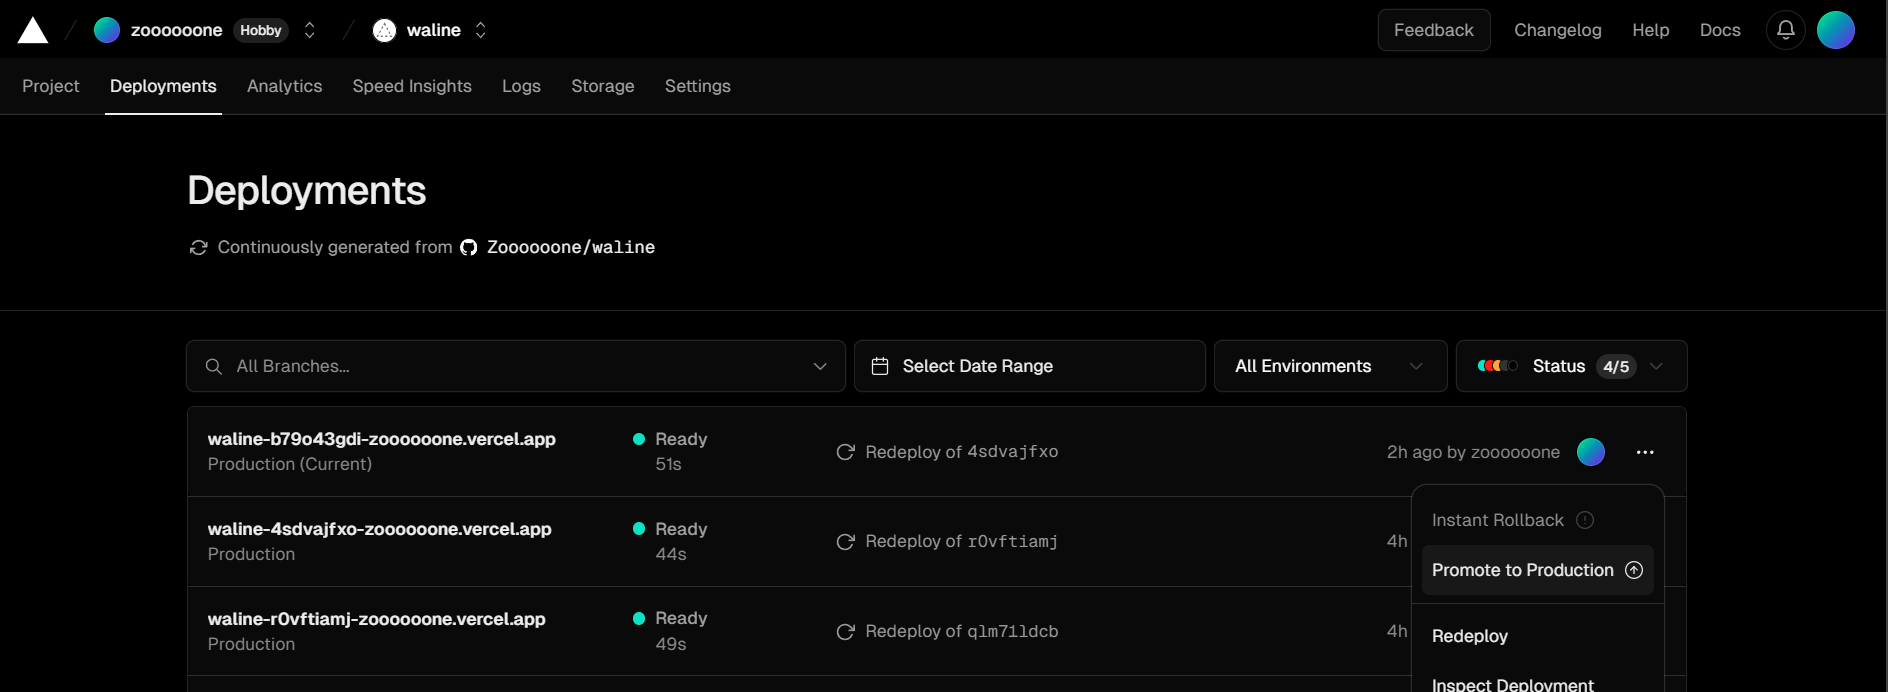
- 从Vercel的Dashboard中进入先前已部署好的评论系统,点击上边栏中最右侧的 Settings 。
![]()
- 选中左侧边栏中的 Environment Variables,按要求添加所需的环境变量并保存。
![]()
- 选中上边栏中的 Deployments,点击最晚的那一条部署完毕的信息右侧的
...,选择 Redeploy![]()
- 重新部署完毕后,参照 此处 点击 Visit ,随后进入测试界面发送一条评论,以确认邮箱是否会收到通知邮件。
Gmail无法收到通知的解决方案
从教程来看这个设置并不困难,只要按部就班地完成似乎就没有什么问题了。然而事与愿违,本人按照流程正确地设置完后邮箱仍旧无法收到通知邮件。这就让人感到困惑了,到底是哪里出了问题?于是便google了一下想找找看有没有和我拥有相似遭遇并成功将问题解决了的人。
经过一番艰苦的查找后,我终于找到了救星,这还得感谢使用Waline给Hexo静态博客添加评论系统这篇博文的作者大大。问题的原因在于我使用的是Gmail邮箱接收通知,他提到如果是采用Gmail接收通知的话,需要先对Gmail进行开启IMAP和单独应用密码设置,然后用单独应用密码登录,而在默认的设置中这两项是不被启用的。
既然有了解决方案,接下来的任务就是完成这部分的设置,由于本人chrome浏览器的默认语言设置为日语,所以后续流程都会贴出图片辅以说明:
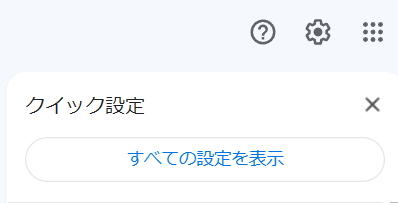
- 开启IMAP
- 进入Gmail邮箱,点击右上角设置(齿轮状图标),选择 すべての設定を表示。
![]()
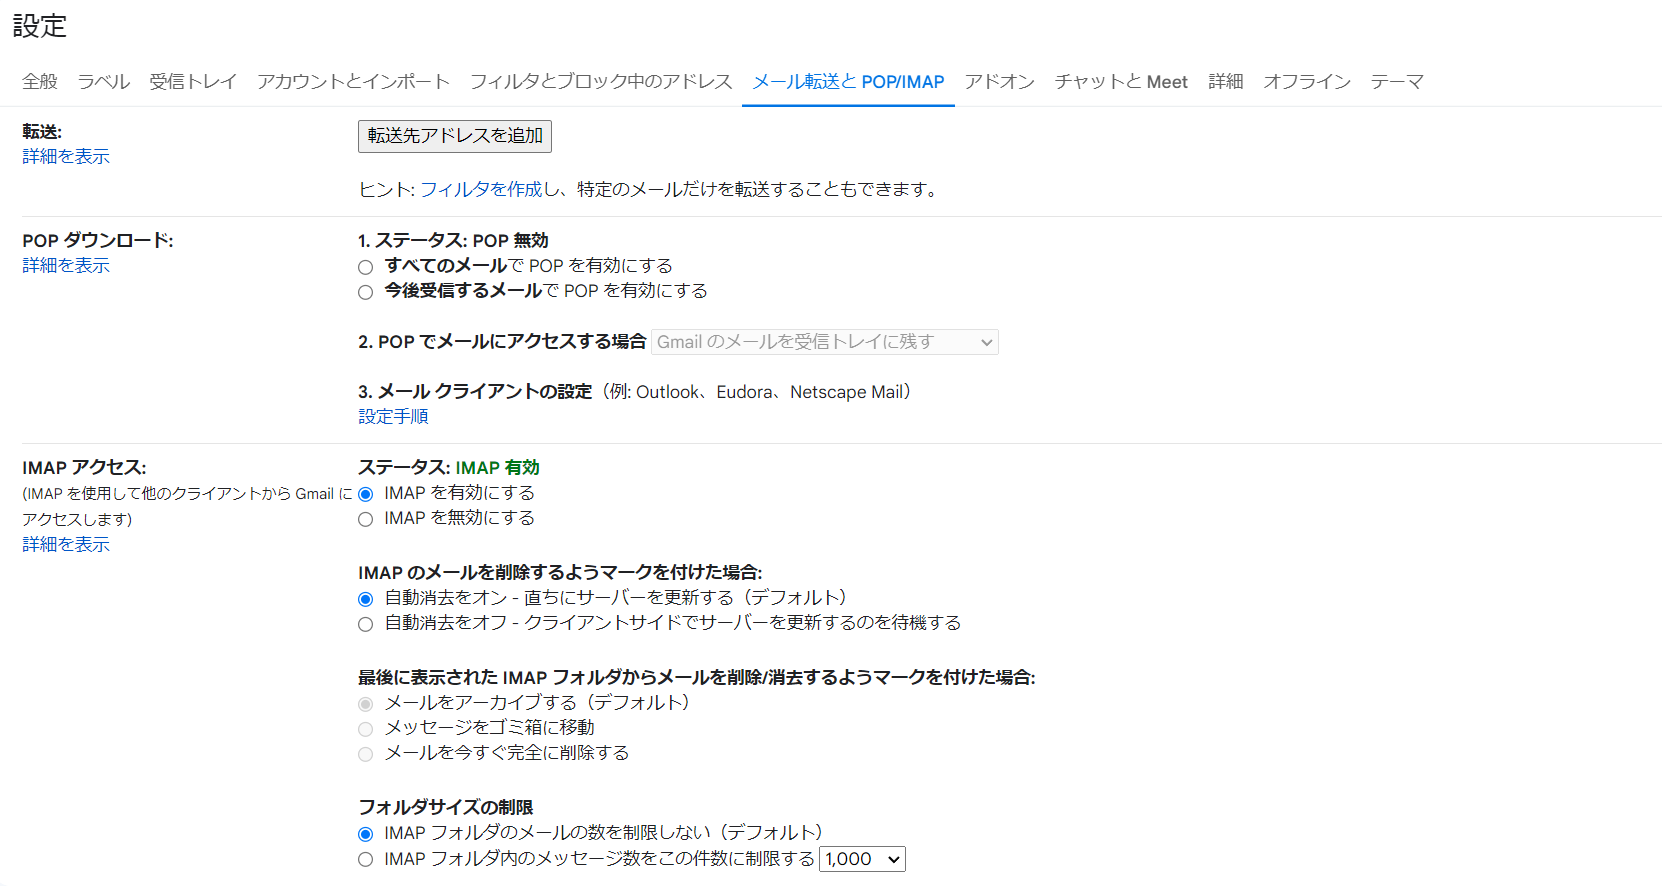
- 选择上边栏中的 メール転送と POP/IMAP,然后 ステータス 选定 IMAP を有効にする,完成后将会如图所示。
![]()
- 进入Gmail邮箱,点击右上角设置(齿轮状图标),选择 すべての設定を表示。
- 生成单独应用密码
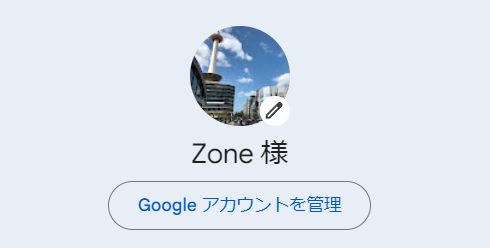
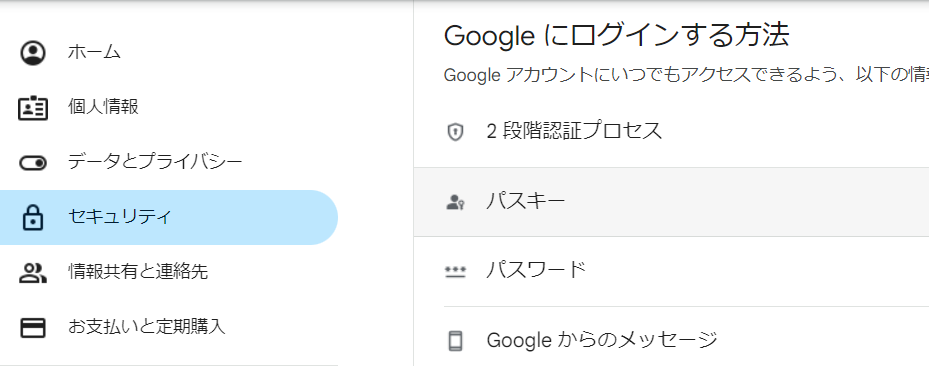
- 点击邮箱右上角头像,选择 Google アカウントを管理 。
![]()
- 左侧边栏选中 セキュリティ, 然后 Google にログインする方法 中选中 2段階認証プロセス 。
![]()
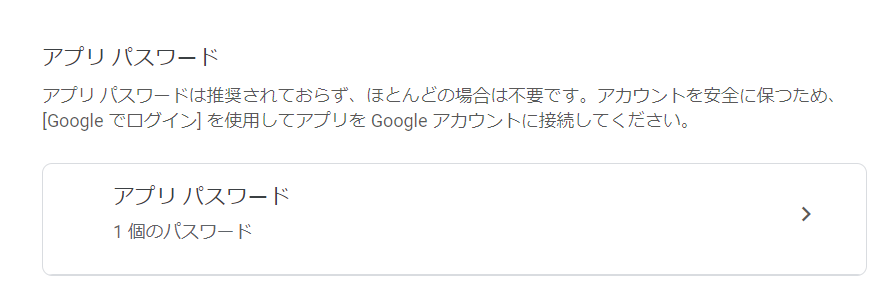
- 进入后滑动到页面最底端,选择 アプリ パスワード 。
![]()
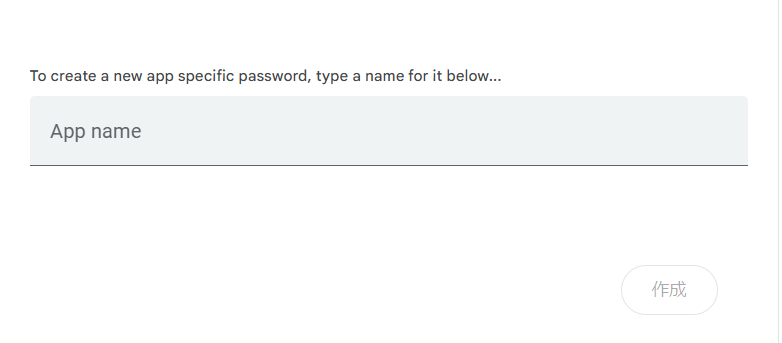
- App name处选择自己偏好的名称即可,填好名称后点击 作成 ,便会自动生成一个16位的单独应用密码,我们只需将这个密码设置为服务端部署环境变量中的
SMTP_PASS的值即可。![]()
- 点击邮箱右上角头像,选择 Google アカウントを管理 。
完成以上设置后测试邮件通知功能,顺利完成!
3. 评论区样式
深色主题自动切换
依照waline官方给出的 教程,waline评论区可以应用深色主题以达到与博客主题颜色相匹配(waline评论区默认为浅色主题,无法随着博客切换至深色主题而自动切换)。具体设置时根据不同的博客环境有如下两种情况:
- 使用
@media选择器通过prefers-color-scheme来根据设备颜色模式状态自动切换 - 通过修改 dom 根元素 (
html或body) 的属性与class来动态应用或取消深色主题的颜色样式
针对符合第一种情况的博客,只需要在
1
2
3
4
5
6
7
import { init } from 'https://unpkg.com/@waline/client@v2/dist/waline.mjs';

init({
    el: '#waline',
    serverURL: 'https://your-domain.vercel.app',
    comment: true,
});
这部分waline的初始化语句中添加dark参数,然后将其值设定为'auto'即可。
1
dark: 'auto'
对于此博客来说这个方法并不奏效,遂参考第二种情况。第二种情况需要我们找到控制博客主题颜色的那部分语句。经过一番查找后,发现其位于 _sass/addon/commons.scss 中:
1
2
3
4
5
6
7
8
9
10
11
12
13
14
15
16
17
18
19
20
21
22
23
24
25
html {
@media (prefers-color-scheme: light) {
    &:not([data-mode]),
    &[data-mode='light'] {
    @include light-scheme;
    }

    &[data-mode='dark'] {
    @include dark-scheme;
    }
}

@media (prefers-color-scheme: dark) {
    &:not([data-mode]),
    &[data-mode='dark'] {
    @include dark-scheme;
    }

    &[data-mode='light'] {
    @include light-scheme;
    }
}

font-size: 16px;
}
ps:阅读了这一段语句后个人感觉该博客似乎还是对应第一种情况的,但不知为何按照教程设置后并不管用。也有可能是本人对于这一部分的知识不甚了解,因而得出了错误的结论。如果有熟悉此部分原理的朋友还请指出,本人感激不尽。
回到正题,这一部分关于博客主题颜色切换的逻辑总结如下:
- 若当前用户设备的颜色偏好设置为浅色,也即
prefer-color-scheme的值为light时:- 若
<html>元素没有data-mode属性,或其data-mode属性为light时,调用浅色主题 - 若
<html>元素的data-mode属性为dark,调用深色主题
- 若
- 若当前用户设备的颜色偏好设置为深色,也即
prefer-color-scheme的值为dark时:- 若
<html>元素没有data-mode属性,或其data-mode属性为dark时,调用深色主题 - 若
<html>元素的data-mode属性为light,调用浅色主题
- 若
更直观些,用流程图来表示其主题匹配逻辑如下:
graph LR
    media[media] --> prefer{prefer-color-scheme};

    prefer -->|light| light{has data-mode?};
    light -->|No| LN(light-scheme);
    light -->|Yes| data-mode-light{data-mode};
    data-mode-light -->|light| LL(light-scheme);
    data-mode-light -->|dark| LD(dark-scheme);

    prefer -->|dark| dark{has data-mode?};
    dark -->|Yes| data-mode-dark{data-mode};
    data-mode-dark -->|light| DL(light-scheme);
    data-mode-dark -->|dark| DD(dark-scheme);
    dark -->|No| DN(dark-scheme);
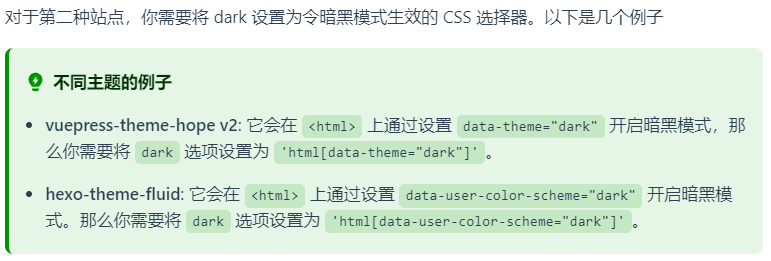
waline官网针对第二种情况也给出了一些案例,大致如下:
根据官网给出的提示,我将waline初始化的部分修改如下:
1
dark: "html[data-mode=dark]"
问题分析
本以为应该大功告成了,但是测试后发现一切并不是那么简单。在又经过了无数次试错后,我终于大致弄明白了这是怎么一回事。首先这里的prefer-color-scheme我起初以为对应的是人为设置的主题,也就是浏览者在博客页面左下角选择的当前主题。但经过了多次实验后我发现它其实是根据设备的系统时间决定的,与浏览者手动选择的主题无关。
依据来源于以下实验(实验时间为晚上7点,默认颜色偏好为dark):
| waline初始化设置 | 浏览者的手动选择 | 评论区呈现出的主题 |
|---|---|---|
"html[data-mode=dark]" | dark | dark |
"html[data-mode=dark]" | light | light |
"html[data-mode=light]" | dark | light |
"html[data-mode=light]" | light | light |
"html:not([data-mode])" | dark | light |
"html:not([data-mode])" | light | dark |
根据实验结果可以总结出以下两个结论:
- 从上至下第一部分颜色区块中waline的设置为:只有当评论区的
data-mode属性为dark时,评论区才会更换为深色主题。而根据其结果可以得出:prefer-color-scheme=dark+ 手动选择dark$\rightarrow$data-mode=dark - 从上至下第三部分颜色区块中waline的设置为:只有当评论区不拥有
data-mode属性时,评论区才会更换为深色主题。而根据其结果可以得出:prefer-color-scheme=dark+ 手动选择light$\rightarrow$not([data-mode])
由此结果可以合理猜测:
- 当根据系统时间决定的
prefer-color-scheme与手动选择的主题 匹配 时,data-mode属性为指定的对应主题。 - 当根据系统时间决定的
prefer-color-scheme与手动选择的主题 不匹配 时,则元素不具有data-mode属性。
解决方案
那么想要实现评论区主题的自动切换就需要写一套比较复杂的逻辑,而考虑到本人对于前端技术的理解极其有限,所以最终采取了一套更为粗暴的解决方案,即直接在博客设定的css样式中定义不同主题下waline评论区的样式。而关于waline的自定义样式,官网也给出了详细的说明(参考 此处)。
最终的实现方式:
- 浅色主题,在 _sass/colors/light-typography.scss 中添加:
1
2
3
4
5
6
7
8
9
10
11
12
13
14
15
16
17
18
19
  /* waline */
  --waline-white: #fff;
  --waline-light-grey: #999;
  --waline-dark-grey: #666;
  --waline-color: #444;
  --waline-bgcolor: #f0f3f6;
  --waline-bgcolor-light: #f8f8f8;
  --waline-bgcolor-hover: #f0f0f0;
  --waline-border-color: #d3d4d7;
  --waline-disable-bgcolor: #f8f8f8;
  --waline-disable-color: #000;
  --waline-bq-color: #f0f0f0;
  --waline-info-bgcolor: #f8f8f8;
  --waline-info-color: #999;
  --waline-theme-color: #80a4dc;
  --waline-active-color: #4870d4;
  --waline-code-bgcolor: #434d62;
  --waline-badge-color: #109658;
  --waline-box-shadow: 0 12px 40px rgb(134 151 168 / 25%);
- 深色主题,在 _sass/colors/dark-typography.scss 中添加:
1
2
3
4
5
6
7
8
9
10
11
12
13
14
15
16
17
18
19
  /* waline */
  --waline-white: #000;
  --waline-light-grey: #666;
  --waline-dark-grey: #999;
  --waline-color: #888;
  --waline-bgcolor: rgb(25 25 32);
  --waline-bgcolor-light: rgb(30 31 38);
  --waline-bgcolor-hover: #444;
  --waline-border-color: #333;
  --waline-disable-bgcolor: #444;
  --waline-disable-color: #272727;
  --waline-bq-color: #272727;
  --waline-info-bgcolor: #272727;
  --waline-info-color: #666;
  --waline-theme-color: #4a84d9;
  --waline-active-color: #98c4fe;
  --waline-code-bgcolor: #282c34;
  --waline-badge-color: #0ecf75;
  --waline-box-shadow: 0 12px 40px #0f0e0d;
其他自定义样式
在此博客的自定义评论区样式中,还包括以下一些部分:
- 评论区边框样式
- 评论者徽章颜色
- 提交按钮悬停效果
具体内容位于 _sass/addon/commons.scss 中:
1
2
3
4
5
6
7
8
9
10
11
12
13
14
15
16
17
#waline{
  width: 100%;
  height: 100%;
  --waline-border: 2px solid var(--waline-border-color);
  --waline-badge-font-size: 0.775rem;

  .wl-btn {
    transition-duration: 0.15s;
    transition-property: border-color, color, background-color;
  }

  .wl-btn:hover, .wl-btn:active {
    border-color: var(--waline-active-color);
    color: var(--waline-white);
    background-color: var(--waline-active-color);
  }
}
也可以参照 官方源码 进行更多的自定义设计。
4. 浏览量统计与显示
官方文档
waline提供了两种浏览量统计方式(官方文档):
- 与waline评论系统一起使用,在waline初始化时将参数
pageview设为true。1 2 3 4 5 6 7 8
import { init } from 'https://unpkg.com/@waline/client@v2/dist/waline.mjs'; init({ el: '#waline', serverURL: 'https://your-domain.vercel.app', comment: true, pageview: true, // enable pageview count });
此方法的缺点是博客界面每次被刷新都会被强制统计浏览量,而当博客更新内容处于本地调试阶段的时候显然是不希望这种事情发生的。
- 与waline评论区分离,作为一个单独的模块使用 waline也支持浏览量统计作为一个单独的功能模块被调用,方法如下:
1
2
3
4
5
6
7
8
  <script type="module">
  import { pageviewCount } from 'https://unpkg.com/@waline/client/dist/pageview.mjs';

  pageviewCount({
      serverURL: '<YOUR_SERVER_URL>',
      path: window.location.pathname,
  });
  </script>
需求及其实现
- 博客文章的发布日期右侧能够显示此文章当前的浏览量
- 博客主页显示浏览量
- 浏览量在本地调试的过程中不被统计
- 如果技术允许,希望博主浏览页面时也不被统计浏览量。
需求1:本地调试时规避浏览量统计
在引入pageview模块时额外添加一个条件,用于判断当前的运行环境。Jekyll在本地渲染预览网页时其对应的地址是127.0.0.1,利用这个特点可以将引入模块部分的语句修改如下:
1
2
3
4
5
6
7
8
9
10
11
12
13
14
15
if (window.location.hostname !== "localhost" && window.location.hostname !== "127.0.0.1") {
  import('https://unpkg.com/@waline/client@3.0.0-alpha.7/dist/pageview.js')
    .then(({ pageviewCount }) => {
      pageviewCount({
        serverURL: '<YOUR_SERVER_URL>',  /* enter your server url */
        path: window.location.pathname,
        update: true,
      });
    })
    .catch(error => {
      console.error("Error loading pageviewCount:", error);
    });
} else {
  console.log("In local environment, pageview count is not updated.");
}
这里有几个需要注意的点:
官方给出的导入模块方式是采用静态导入,使用的是
import语句,其不能位于代码块中。想要实现在条件判断语句中执行导入操作的话则应该更换为动态导入,使用import()函数。( 参考链接 )单独导入浏览量统计模块时,无需在waline初始化时设置
pageview参数为true当前时间点(2023.12.18)下,官方文档中给出的
pageview模块的版本号似乎有误,无法正确导入。根据模块路径https://unpkg.com/browse/@waline/client/查找到 最新版本文件 ,在package.json中搜索到这样一段代码:1 2 3 4 5
"./pageview": { "types": "./dist/pageview.d.ts", "import": "./dist/pageview.js", "default": "./dist/pageview.umd.js" }
所以导入时的路径应该 将
/dist/pageview.mjs修改成/dist/pageview.js。
至此,本地调试时浏览量的确不会被统计了。但是有一个新的问题:根据上述语句的逻辑,本地调试时不仅浏览量不会被统计,整个浏览量显示模块都不会被导入。这就导致浏览量直接无法显示。好在官方给出的模块中可以自定义浏览量是否更新,所以上述语句可以进一步修改为:
1
2
3
4
5
6
7
8
9
10
11
12
13
14
15
16
17
18
19
20
21
22
23
24
25
26
if (window.location.hostname !== "localhost" && window.location.hostname !== "127.0.0.1") {
  import('https://unpkg.com/@waline/client@3.0.0-alpha.7/dist/pageview.js')
    .then(({ pageviewCount }) => {
      pageviewCount({
        serverURL: '<YOUR_SERVER_URL>',  /* enter your server url */
        path: window.location.pathname,
        update: true,
      });
    })
    .catch(error => {
      console.error("Error loading pageviewCount:", error);
    });
} else {
  import('https://unpkg.com/@waline/client@2.15.8/dist/pageview.js')
    .then(({ pageviewCount }) => {
      pageviewCount({
        serverURL: '<YOUR_SERVER_URL>',  /* enter your server url */
        path: window.location.pathname,
        update: false,
      });
    })
    .catch(error => {
      console.error("Error loading pageviewCount:", error);
    });
  console.log("In local environment, pageview count is not updated.");
}
这其中还有一个非常小的细节,就是 引入的 pageview 模块版本不同 。本地调试时 update 属性的值为 false ,而由于不明原因,3.0.0-alpha.7 版本的模块无法正常显示浏览量,如果想要解决可能需要深入阅读源码才能解决。为了更加效率地解决问题,我尝试了多个版本的模块。最终,我发现 2.15.8 版本的模块可以正常显示浏览量,于是便选择在本地调试时导入此版本的模块以满足需求。
完成了上述动态导入的逻辑后,还要补充上浏览量的文字显示:
1
2
3
4
5
6
7
8
9
<style>
.waline-pageview-count {
font-family: var(--bs-font-sans-serif);
font-size: 0.8rem;
color: rgb(137, 152, 166);
}
</style>
  PageView: <span class="waline-pageview-count"></span>
最后,将两部分语句合并到一起整合成一个完整的html文件,命名为 pageview.html 并 存放到 _includes 目录下 以便后续引用。
需求2:博主浏览时规避浏览量统计
思路是添加一个对于博主身份的验证,验证通过后在浏览器中添加一个cookie,动态导入 pageview 模块时除了判断是否为本地调试环境,还需要判断这个cookie的值是否为 true,如果不是则更新浏览量,反之则不更新。假设cookie的名称为 blogger_visit,那么获取其值以及添加到判断中的方式如下:
1
2
3
4
5
6
7
const isBlogger = document.cookie.split('; ').find(row => row.startsWith('blogger_visit='));

if (!isBlogger && window.location.hostname !== "localhost" && window.location.hostname !== "127.0.0.1"){
    /* update pageview */
} else {
    /* don't update pageview */
}
将其补充到需求1中已经实现的代码里即可。
接下来的问题是如何实现验证博主身份这个过程。这里又有两个子需求:
- 博主可以 主动验证身份
- 身份验证 仅博主 可以通过
解决方案:
- 在博客页面中添加一个用于身份验证的交互按钮
- 完成交互的必要条件是输入正确的密码(仅博主知晓)
实现方式
设置交互按钮相对比较简单,且可以在实现加密验证后再实装,所以这里先讨论如何实现加密验证。通常来说为了安全性,密码的验证会在后端完成,但考虑到:
- 本人技术水平有限
- 此验证仅用于实现浏览量更新相关的设置,安全隐患较低且泄密对于博主来说不会造成特别重大的损失
所以暂时将验证行为也放在前端完成。但又不希望密码直接暴露在代码中,故决定采用哈希函数加密。设置cookie以及实现密码验证的代码如下:
1
2
3
4
5
6
7
8
9
10
11
12
13
14
15
16
17
18
19
20
21
function setBloggerCookie() {
    document.cookie = "blogger_visit=true; max-age=31536000; path=/";
    alert('Blogger cookie set!');
}

async function verifyPassword() {
    const password = prompt("Please enter the password: ");
    const msgBuffer = new TextEncoder().encode(password);
    const hashBuffer = await crypto.subtle.digest('SHA-256', msgBuffer);

    const hashArray = Array.from(new Uint8Array(hashBuffer));
    const hashHex = hashArray.map(b => b.toString(16).padStart(2, '0')).join('');

    const passwordHash = "<YOUR_HASHED_PASSWORD>";  /* enter your hashed password */

    if(hashHex === passwordHash) {
    setBloggerCookie();
    } else {
    alert("Password is incorrect");
    }
}
利用Web Crypto API获取输入密码的SHA-256哈希值,存储于 hashHex 中,并与预先设置好的密码的哈希值 passwordHash 进行比对。事先设想好的密码的哈希值可以参考
1
2
3
4
5
6
const password = prompt("Please enter the password: ");
const msgBuffer = new TextEncoder().encode(password);
const hashBuffer = await crypto.subtle.digest('SHA-256', msgBuffer);

const hashArray = Array.from(new Uint8Array(hashBuffer));
const hashHex = hashArray.map(b => b.toString(16).padStart(2, '0')).join('');
这一部分来获取。
1
console.log(hashHex);
至此,密码验证部分完成。对交互按钮的设计以及最终的完整源码感兴趣的读者请移步:源码查看 。
需求3:显示文章浏览量
对于博客文章浏览量,我希望它能够在发布日期右侧被显示,所以需要定位到管理发布日期显示的那一部分语句。对于此博客来说,其位于 _layouts/post.html 中:
1
2
3
4
5
6
7
8
9
10
11
12
13
<!-- published date -->
<span>
    {{ site.data.locales[lang].post.posted }}
    {% include datetime.html date=page.date tooltip=true lang=lang %}
</span>

<!-- lastmod date -->
{% if page.last_modified_at and page.last_modified_at != page.date %}
<span>
    {{ site.data.locales[lang].post.updated }}
    {% include datetime.html date=page.last_modified_at tooltip=true lang=lang %}
</span>
{% endif %}
然后只需将以下语句插入到上述内容之后即可。
1
2
<!-- pageview count -->
{% include pageview.html %}
需求4:显示主页浏览量
定位到 _layouts/home.html,在其头信息里添加:
1
2
tail_includes:
 - pageview
测试
例子
当前文章浏览量: